Wednesday, February 23, 2011

Cake skills coming along...

My classes at ICE were. awesome. I especially loved the second class I took- we learned more advanced techniques in that class, and it was so fun to just get lost in what I was doing. We did this technique called Australian string work, and you have to concentrate really hard on it, so it was nice to clear my mind and not think about anything else but that. It was actually kind of relaxing. I am SO proud of my final product from the second class. We covered styrofoam cake dummies with fondant, did Australian string work and lace work on the bottom, free hand designs on the sides, and gumpaste flower sprays on the top.  When I showed Nate the cake, he had to touch the flowers to see if they were real or not. :)  I love it!


The first class was fun as well, but much more basic. We learned mostly piping skills as well as chocolate roses and marzipan fruit.
The peach was my favorite!
Aren't they so cute?

Barbie Cake

My neighbor Clare's little girl Addi turned 4 this week. Her girls saw this cake at the Chelsea Market, so she took me there to show it to me to see if I could make it for Addi's birthday.
I thought it would be a very fun project, so I said I would do it. I hate putting this picture in the same post as my cake, because it makes my cake look pathetic. :( Even though it is definitely not as good as this one, I thought it turned out pretty good, and it was definitely a lot of fun to make. I started it on Tuesday and worked all week on it and added the final touches on Sunday, the day of the party. I actually didn't have time to add a few more things, like making the center flower thicker so it would stand out more, or the dots on the skirt, but I was ok with that. Here it is in the first stage. I used rice crispy treats, because I knew it would take me all week, and I don't know how good a cake would have tasted after being out all week. Plus it was way easier to form, and sturdier.
Here is Asher on the way to her party, dressed as a "beautiful princess" in her honor.  In his hand is a valentine/birthday card that he asked me to help him with.  It is a heart with a picture of him and Addi dancing and hugging.  It was the cutest thing listening to him tell me exactly what to draw and write.
And here is the finished product. 
I really should have taken more pictures of the process because it really was a process.  I did the rice crispy treats then frosted it and let it dry over night.  Then I piped the skirt with pink royal icing.  Then I used flood royal icing to paint over the piping to even it out a bit.  Then I drew the design for the dress on parchment paper.  Then I pin-pricked it onto the dress, then I piped it on.  Then I used petal dust to add a little shimmer.  Yeah, it all took a lot of time! 
So I had made cupcakes to eat instead of the "cake", but Addi said she wanted to cut into it, so cut into it we did.  Thankfully her dad cut from the backside.  I was shocked at how yummy and soft the rice crispy treats still were.  I guess they had been covered in frosting from the beginning, and when royal icing dries, it gets really hard.
Anyway, I got a lot of compliments on it, which of course made me happy, and I had a lot of fun making it.  I had a few issues and there are definitely some things that I was not happy with and that I wished I could do over, but it was definitely a great learning experience.  I think I can call it a success!

Sunday, March 8, 2009

Rubber Ducky Cake

I made this cake for Sayer's first birthday. I was trying to decide on a theme to base the cake on, I was trying to think about Sayer and what he likes. Well, he LOVES to take baths, so I went with the rubber ducky theme. I found this cake online, just by browsing through pictures. It was just a picture, and nothing else, but I thought it was so cute, so I just decided to make it up as I went along.

It is a three layer yellow cake (2 8 inch, 1 9 inch) with buttercream frosting. The picture that I saw used fondant for the bucket and bubbles, but since I don't have any fondant or anywhere to buy it, I decided to make english toffee for the bucket. After I made the toffee, I thought how I could have used graham crackers or pretzel rods, and it would have been much easier. Oh well. I thought the toffee looked cute. It was kind of hard to work with, but it all worked out in the end.

For the grass I just used buttercream. The bubbles are whipping cream, which I whipped until it was pretty stiff so that it would keep it's form. I also made some chocolate plastic, which is just white chocolate and karo syrup, and rolled it into balls for rounder looking bubbles.

For the strip around the bucket, I just used foil, which isn't edible, and not super creative, but it worked and looked pretty good I thought.

The cupcakes are just from a box, frosted with buttercream, dyed chocolate plastic for the bubbles and peeps for the "ducks".

The yellow cake and buttercream recipe I used were from Bakerella. I know, I'm branching out from Epicurious! I thought they both turned out really yummy, and the cake was moist!

Monday, March 24, 2008

White Chocolate Truffle Cake

White Chocolate Truffle and Chocolate Fudge Layer Cake

I made this for Easter yesterday, and it turned out SO great. I think this was people's favorite cake so far. A definite keeper! I followed some of the tips online (epicurious of course!) A lot of people said the truffle filling and the frosting melted really easily. So I put the truffle in the freezer overnight, and the frosting in the fridge overnight, and re-whipped the frosting before putting it on the cake. The frosting never melted, but the filling did, even after being in the fridge for a few hours. It was still great though! I also baked the cake for about 5 minutes less, as people thought it got too dry. Mine turned out great! I also didn't have star cutters, so I just cut different random pieces, and I liked the way that turned out. It was kind of sad though, on the drive up to Sandy, it was so warm out, that the chocolate cut-outs started melting and curving in the sun. It actually looked kind of cool though. Here is the recipe, good luck and enjoy!

Chocolate stars
6 ounces bittersweet (not unsweetened) or semisweet chocolate, chopped
1 tablespoon solid vegetable shortening
Nonstick vegetable oil spray

Cake
4 ounces unsweetened chocolate, chopped
1 3/4 cups all purpose flour
1/4 cup unsweetened cocoa powder
1 teaspoon baking powder
3/4 teaspoon baking soda
1/2 teaspoon salt
2 cups sugar
1/2 cup (1 stick) unsalted butter, room temperature
2 teaspoons vanilla extract
2 large eggs
1 1/2 cups whole milk

Filling and frosting
3 cups chilled whipping cream
1/4 cup (1/2 stick) unsalted butter, cut into pieces
1 pound good-quality white chocolate (such as Lindt or Baker's), finely chopped
2 teaspoons vanilla extract

1/2 teaspoon almond extract

4 tablespoons amaretto or other almond liqueur (I didn't use this)

Preparation

For chocolate stars:
Line baking sheet with foil. Stir chocolate and shortening in top of double boiler set over simmering water until melted and smooth. Pour onto prepared baking sheet, tilting pan to spread chocolate mixture to irregular 14x9-inch rectangle. Refrigerate until just firm, about 12 minutes. Spray assorted star-shaped cookie cutters with nonstick spray. Cut out stars. Refrigerate until firm, about 30 minutes. Using small offset spatula, carefully transfer stars 1 at a time to another foil-lined baking sheet. Refrigerate until ready to use. (Can be made 3 days ahead. Cover and keep refrigerated.)

For cake:
Preheat oven to 350°F. Butter two 9-inch-diameter cake pans with 1 1/2-inch-high sides. Line bottoms with parchment paper; butter parchment. Stir unsweetened chocolate in heavy medium saucepan over low heat until melted and smooth. Cool slightly. Sift flour, cocoa powder, baking powder, baking soda, and salt into medium bowl. Using electric mixer, beat sugar and butter in large bowl until well blended. Beat in lukewarm melted unsweetened chocolate and vanilla. Beat in eggs, 1 at a time, blending well after each addition. Mix in cocoa powder mixture in 3 additions, alternating with milk in 2 additions.

Divide batter between prepared pans. Bake cakes until tester inserted into center comes out clean, about 35 minutes. Cool cakes in pans on racks 10 minutes. Run knife around edge of each pan to loosen cakes. Turn cakes out onto racks and cool completely. Peel off parchment.

For filling and frosting:
Bring 1 cup cream and butter to simmer in heavy medium saucepan over medium heat, stirring until butter melts. Remove from heat. Add white chocolate and stir until smooth. Whisk in vanilla. Pour 1 1/2 cups white chocolate filling into small bowl; cover and freeze until cold, about 2 hours.

Let remaining white chocolate mixture in saucepan stand at room temperature until lukewarm, about 20 minutes.

Using electric mixer, beat remaining 2 cups cream and almond extract in large bowl until peaks form. Working in 3 batches, fold in lukewarm white chocolate mixture. Refrigerate whipped cream frosting just until medium peaks hold, folding occasionally, about 3 hours.

Brush 2 tablespoons amaretto over top of each cake layer. Place 1 layer on platter. Spread chilled 1 1/2 cups white chocolate filling over. Top with second cake layer. Spread whipped cream frosting over top and sides of cake. Chill until cold and set, about 1 hour. (Can be made 1 day ahead. Cover and keep refrigerated.)

Arrange chocolate stars decoratively atop cake and serve.

Thursday, February 14, 2008

The Ultimate Valentine's Day Cake


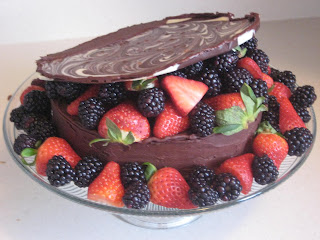
So if you don't like Chocolate, or can't eat it for some reason, I am truly sorry, as you are missing out on one delicious cake!! Isn't it gorgeous? I have been opening the fridge all day just to admire it! As you can see, I had a little trouble with the lid, the edges are a little rough, I will have to trim it a little better next time. The whole cake is actually supposed to be in the shape of a heart, but apparently stores carry heart shaped cake pans all year round except for the month of LOVE! Couldn't find one anywhere! Oh well, it still looks great, though I do say so myself!!

I've decided that chocolate mixed with berries (especially raspberries) is ABSOLUTELY to die for. I LOVE it! The frosting on this cake is also SOOO yummy. I promise you will NOT be disappointed!

This cake is of course from Epicurious (have I mentioned how much I love that site??). It had some reviews that said that it was way too time consuming and not worth it. But let me tell you, it is not that time consuming AT ALL, and it is SOOO worth it! Making the lid and the cake took me less than an hour (not including baking time of course), I made the icing about half way through the baking process (the icing takes all of 5 minutes), and then watched a movie for the rest of the time! I frosted it last night, so it set all night long. Then this morning, it took hardly anytime at all to garnish and put it together, maybe 10 or 15 minutes. So I promise, this is not as daunting as it looks. I have some suggestions to make it better, but I will save those for the end of the post! Also, I could not find a picture of this anywhere (despite numerous comments about how beautiful it was) so I made sure that I included many pictures for your viewing pleasure!!

Chocolate Heart Lid
3 ounces imported white chocolate (such as Lindt or Tobler), chopped
3 ounces bittersweet (not unsweetened) or semisweet chocolate, chopped

Cake
9 ounces imported white chocolate (such as Lindt or Tobler), chopped
5 large eggs, separated, room temperature
1/2 cup plus 1 tablespoon sugar
1tablespoon framboise liqueur or Grand Marnier
1 teaspoon vanilla extract
6 tablespoons (3/4 stick) unsalted butter, melted, warm
3/4 cup cake flour

Icing
12 ounces bittersweet (not unsweetened) or semisweet chocolate, chopped
1 1/4 cups (2 1/2 sticks) unsalted butter
3 tablespoon light corn syrup
3 tablespoons framboise liqueur or Grand Marnier

Assembly
1 1-pint basket strawberries, hulled and halved
1 1/2-pint basket raspberries
1 1-pint basket strawberries with stems, halved through stem end (stems left intact)

Berry Compote
2 1-pint baskets strawberries, hulled and sliced
3 tablespoons sugar
2 tablespoons framboise liqueur or Grand Marnier
2 1/2-pint baskets raspberries

To make heart lid:
Cut heart-shaped piece of waxed paper about 4 inches larger than 8x2-inch bottomless heart-shaped cake pan. Place on cookie sheet. Lightly oil inside of heart pan with vegetable oil. Butter outside of pan. Place heart pan atop paper on cookie sheet. Press waxed paper up onto outside of buttered pan to adhere, to prevent chocolate from leaking out. Place white chocolate in bowl. Set bowl over saucepan of simmering water; stir until smooth. Remove from over water. Place bittersweet chocolate in another bowl. Set bowl over saucepan of simmering water; stir until smooth. Remove from over water.
Drop white chocolate by spoonfuls inside heart, spacing apart and allowing some to touch inner edge of pan. Drop bittersweet chocolate by spoonfuls into spaces. Move heart pan gently from side to side to distribute chocolate evenly and fill in heart completely.

Swirl mixtures together using tip of knife.

Holding cake pan to cookie sheet with hands, tap sheet firmly on counter to flatten chocolate. Freeze until firm, about 20 minutes.

Run small sharp knife around outside of pan to loosen chocolate. Remove pan. Refrigerate chocolate lid until ready to use. (Can be prepared 1 week ahead. Cover with plastic wrap.)

To make cake:
Preheat oven to 350°F. Butter and flour 8x2-inch bottomless heart-shaped cake pan. Cut heart-shaped piece of heavy-duty foil 4 inches larger that heart cake pan. Butter and flour foil. Place on heavy large cookie sheet or double-stacked cookie sheets. Center heart pan on foil. Wrap foil around outsides of pan, folding, pressing and crimping firmly to adhere, to batter from leaking out. Place white chocolate in bowl. Set bowl over sauce-pan of simmering water; stir until smooth. Remove from over water.

Using electric mixer, beat yolks and 1/2 cup sugar in large bowl until pale yellow and slowly dissolving ribbon forms when beaters are lifted, about 3 minutes. Beat in framboise and vanilla, then butter. Add melted chocolate and beat until just combined.

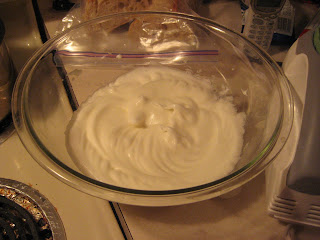
Using electric mixer fitted with clean dry beaters, beat whites in large bowl to soft peaks. Gradually add remaining 1 tablespoon sugar and beat until just stiff.

Mix flour into chocolate mixture (batter will be very thick). Stir in 1/4 of whites to lighten. Gradually fold in remaining whites. Pour batter into prepared pan. Bake 45 minutes. Cover top with foil. Bake until tip of small knife inserted into center of cake comes out clean, about 20 minutes (cake will be well browned). Cool in pan on rack.


To make icing:
Melt chocolate, butter and corn syrup in heavy medium saucepan over low heat, stirring until smooth. Stir in framboise. Cool icing until firm enough to spread, about 2 hours.

Run small sharp knife around cake pan sides to loosen. Cut cake into 2 layers using serrated knife. Place bottom cake layer on platter cut side up. Spread 2/3 cup icing over. Cover with top cake layer cut side down. Spread all but 1/2 cup icing over top and sides of cake.

Refrigerate cake until icing is set, about 1 hour. (Can be prepared 1 day ahead. Cover and refrigerate cake and remaining icing separately. Rewarm icing over very low heat until just spreadable before continuing with recipe.)

To assemble:
Mound some hulled strawberries and raspberries on right half of heart cake. Position lid atop berries at angle, moving berries around so that left edge of lid rests on left edge of cake. Tuck half of strawberries with stems, stems facing out, between cake and lid. Spread remaining icing over sides of cake where lid is attached, smoothing with spatula to create boxlike appearance.

Reserve remaining strawberries and raspberries for garnish. Refrigerate cake until icing is set, about 1 hour. (Can be assembled 12 hours ahead.)

To make Berry Compote:
Toss two 1-pint baskets strawberries with sugar and framboise in large bowl. Chill at least 1 hour or up to 6 hours. Add raspberries and toss gently.

Arrange reserved berries on platter around cake. Serve cake, spooning compote over each piece.


Ok, so I actually had a little trouble with my lid. It kind of bowed, so I would just make sure that you have a very flat surface to let it harden on, and hit the pan on the counter until it is as flat and evenly spread out as possible. I didn't use a bottom-less pan for any of this stuff, and they all turned out fine, actually, I think it made everything move a little faster as it cuts out some steps. Just grease some parchment paper before you pour the chocolate on it, and it comes out super easy!

As for the cake, I don't know how people can bake it for as long as it says to, I only baked mine for 45 minutes total, and I ended up trimming the edges off, as they were a little hard and dry, but the rest of the cake was great. I even followed a suggestion and put a cookie sheet on the bottom rack to try and deflect some of the heat. I think next time, I will cover the whole bottom of the pan and top of the cake with foil so that it doesn't get so dried out, and check it at like 35 or 40 minutes.

I also didn't use any liqueur, not that I am opposed to cooking or baking with it, as the alcohol will cook out, but I just didn't want to spend the money to be honest. I did add some lemon juice for the compote, as well as in the cake batter. The cake also calls for fresh berries, and lots of them. Well, it's February, and berries aren't exactly cheap this time of year. A half pint of raspberries was $4.99. Yeah right was I going to pay that. So, I ended up getting 1 pint each of fresh blackberries and strawberries, and then I used the berry medley from the frozen foods section at Costco for the compote and some of the assembly (minus the blueberries). I thought it turned out just fine, although I do think raspberries taste better with chocolate than blackberries. I also had some frozen strawberries that I used for the compote as well. So, no need to spend a fortune to make this cake! You can also cut costs by using semi-sweet chocolate chips, instead of fancy stuff. The Guittard white chocolate chips happened to be on sale when I bought them, so I lucked out there, but you don't HAVE to use really nice white chocolate either. It will still taste good!! But it might taste even BETTER if you do splurge on the good chocolate!

One more thing... since I used a round pan, I cut off a small portion of one side of the cake and the lid, so that it would be a little more like a box hinge. Ok, happy baking!!

Rocky Road


My hubby LOVES Rocky Road, so for his Valentine's Day treat, I made him a batch. The recipe is super easy, and pretty much foolproof, unless you burn the chocolate! The one thing I would change about this recipe is to either add more chocolate (1/2 C-1 C more) or less peanuts.

2 C Semi sweet chocolate chips
1 14 oz can of sweetened condensed milk
2 Tbs butter

Melt all that in a heavy saucepan over low heat
when melted add:

1 10.5 oz bag mini marshmallows
2 C dry roasted salted peanuts

Mix together and spread into 9x13 pan, put in fridge to chill until set.

Friday, December 28, 2007

Pomegranate Beverage

Pomegranate Beverage


4 C pomegranate juice
1 C cranberry juice
1 C fresh lime juice
4 Tbsp fresh orange juice

freeze pomegranate and cranberry juice in paper cups in about 1 C servings. Mix all ingredients together in a blender until mixed. Pour into glasses and garnish with orange or lime slice.

I kind of just ended up throwing random portions of ingredients in, whatever looked right. It ended up tasting really good, if I do say so myself. I love frozen/slushy drinks, and it was perfect for the holidays!